How I hosted my React based website on github for free
December 14, 2017You probably know github hosting is free for open source projects. But incase you are not aware —** you can also host your personal website there for free**! Few months back — I purchased my domain name. Here are all steps how build my freely hosted react-based website.
STEP 1
Purchase a domain name — mine is http://nitinj.com (warning: Its work in progress!), got from an indian domain provider.
STEP 2
Start a new react project with create-react-app (I know, react can be overkill for personal websites, but I am planning to add some advanced & interesting stuff).
STEP 3
build the project with command
yarn build
It will create a directory “build” in the root of the project. You can run local development server with
yarn start
and see a default react project page.
Now create a new directory “my-project”. Copy content from “build” directory to this “my-project” directory. Inside my-project, create a directory named “source”. Copy all source files from react project to this source directory.
Why this? Because github only allows serving of website files from root directory of repo. So our source will reside in source subdir while out built code will reside in project root directory. You may want to use github submodules or separate projects for this purpose. I wanted to put source plus output in same project.
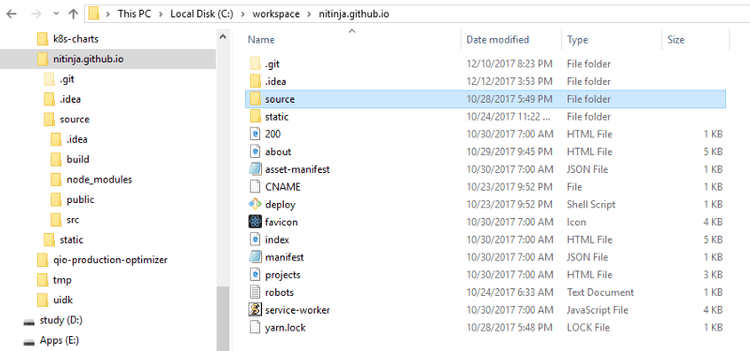
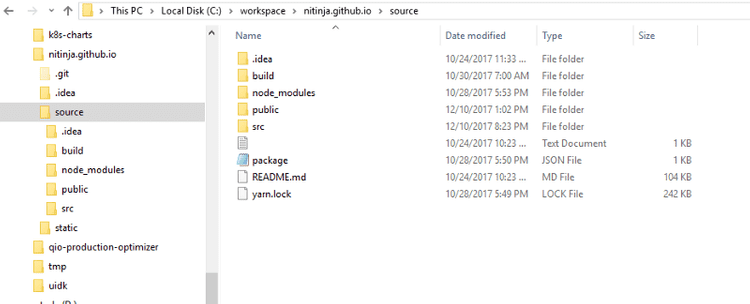
Your directory structure should look like this:
 Outer directory with compiled files as content
 Inner source directory with source code
STEP 4
Create a new file in root directory with name “CNAME” and content as just
yourdomain.com
No http:// needed. commit everything, including build output and source in repository.
STEP 5
Create a new public github project “nitinja.github.io”. You can give a name of your choice — but at the time of creating site, github was forcing such a name format for project if one plans to use the repo for personal website.
Open command line, Go to your react project root directory and add this repo as origin
git remote add origin https://github.com/user/repo.git
this will connect your project to remote github repo.
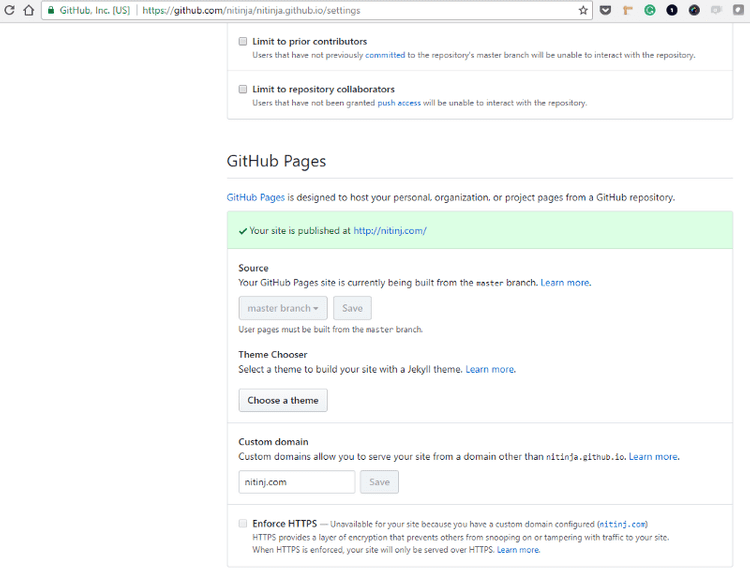
Check “Settings section” of your github repo by visiting github.com > your repo > settings > GitHub Pages section. It should look like this:
 Git hub settings should look like this.
STEP 6
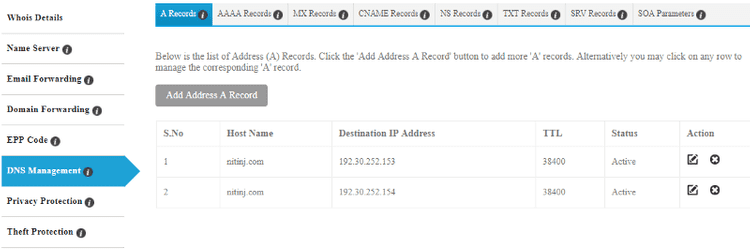
Add following “A Record” configuration to your domain provider settings — it may be well hidden in settings. Basically, you need to add two A records for these IP addresses: 192.30.252.153; 192.30.252.154
After some time, check your domain in browser — It should show react start page!
STEP 7
Time to add real content to your site. Modify source project, add whatever stuff you need. Build project again with
yarn build
Copy content from “build” directory to root directory of your project. Rinse and repeat.
You may want to write a script that does a building, copying and committing files.
Suggestion? Let me know in comments. Thanks!

